How to use your branded PowerPoint template
- Sep 9, 2024
- 7 min read
Updated: Jul 16, 2025
A branded PowerPoint template is a versatile and powerful tool for any organization that gives presentations.
When you're using a branded PowerPoint template, you have all your basics baked directly into the design, making them one of the most effective ways for an organization to reduce the time it takes to create presentations and to ensure they are consistent.
But just having one isn’t enough to ensure you’re getting the most from your branded PowerPoint template. So how do you make sure your team is using templates effectively? With our best tips and tricks!
What is a template?
A PowerPoint template is a set of slide designs that are built to be customized and accommodate a range of slide and content types.
Templates give you the basics, like colors and fonts, pre-designed into a variety of slide types. This gives your team a flexible foundation to build slides, even if you don’t know what types you’ll need yet.
But more than anything else, templates are tools for creating consistency. While they can offer big time savings and simplicity in design, they primarily help ensure that every presentation your team creates puts your brand in the best possible light, no matter what the design skills of the presentation creator.
How can I use a branded PowerPoint template effectively?
Creating a template and using one are very different things. In fact, most people who use templates will likely never create one themselves. So today we’re going to focus more on how to get the most from a template your brand has already created.
And if you are reading this but have no background as a designer, don’t worry! PowerPoint was created with non-designers in mind, so the steps for using a template well are simple.
Getting started with your template
To get started, open up PowerPoint and load up your template from the list (or browse your computer to find it).

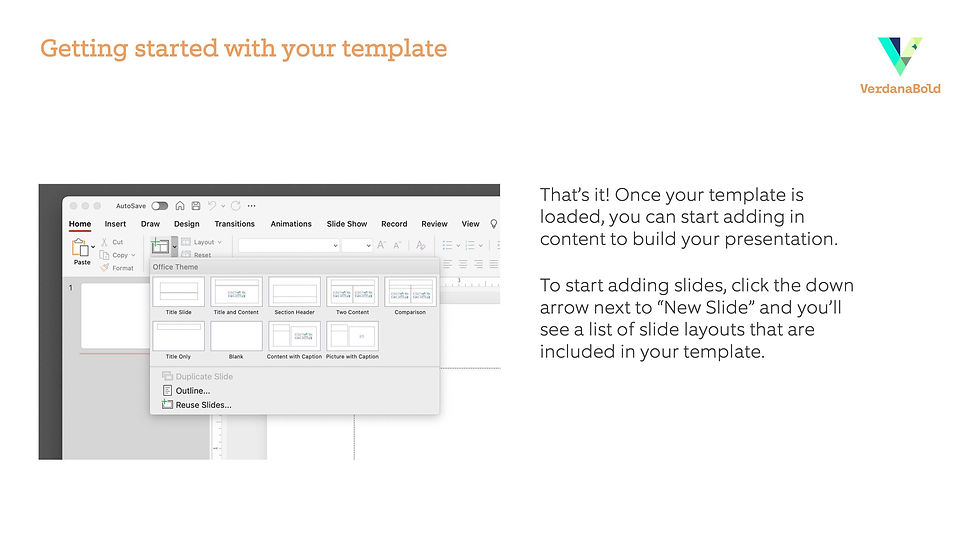
That’s it! Once your template is loaded, you can start adding in content to build your presentation.
To start adding slides, click the down arrow next to “New Slide” and you’ll see a list of slide layouts that are included in your template.
How to change slide types (or layouts)
A good branded template should contain a range of slide types, from cover slides to dividers and simple content to charts. With multiple options to choose from, a template makes it easy to choose the one that best suits your content.
Once you have a slide in your presentation, you can change the basic layout and style at any time. Just select the slide you want to update, then choose from the layouts built into your template.
Best of all, this works even after you have added content to the slide. PowerPoint will do its best to reposition the key elements of your slide to match the new layout, though you should still double-check for accuracy.

Paste content, not slides
Our first tip is all about the best way to get content from one presentation to another.
There are two general ways that people use branded templates: 1) building a new deck from scratch, or 2) updating an existing deck with new slides or content.
It’s a common practice for presenters to build out a deck by pulling in content from previous presentations. But when you are working with a template, pasting whole slides doesn’t just add the slide you want to import, it also adds the layout to your master pages, altering your core template. This is bad.

Instead, pull up a slide in your desired template then paste the content directly. If you want to make sure the format matches there are two ways to do it: with the format painter, or with a keyboard shortcut.
To paste and match style on PC, use CTRL+Shift+C/CTRL+Shift+V.
On a Mac, use CMD+Shift+C/CMD+Shift+V.

Using charts and graphs
One of the best benefits of a template is how easy it makes it to create branded graphics. With a well-made template, you can create charts and graphs that populate with your brand colors by default. If your template includes these items, be sure to use them for your data visualizations.

Quickly change bullet indentations
When you’re working with bullets and sub-bullets, it can be a pain to go back and forth to the toolbar every time you want to change the level of indentation.
Instead, use the Tab key to go down a level, and shift+tab to go back up a level. You can even select a whole chunk of text and change the indent all at cone.
This makes it fast and easy to fine-tune your content on the fly.

How to add page numbers to the footer
From page numbers to sources and more, the footer is a valuable piece of real estate that’s tucked away at the bottom of every slide in your presentation. But adjusting page numbers in the footer manually can cause challenges as you add or modify content in your presentations, so ideally you should make changes to your set up in your template.

How to edit “Live” template elements
For certain commonly used shapes, such as Venn diagrams, a template will often include a “Live” version, which is designed and looked into the template, but that allows you to customize the content.
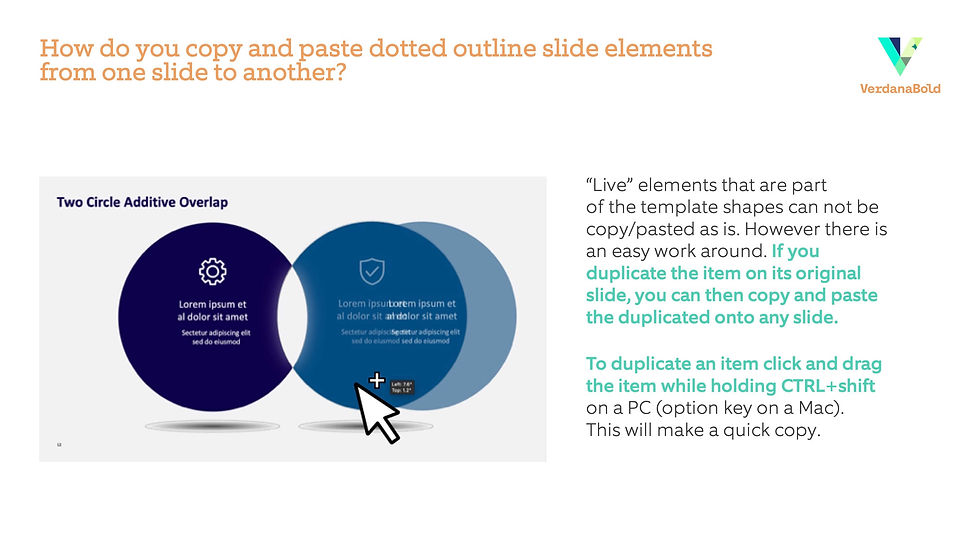
But Live elements, because they are baked into the template, can’t be edited or moved individually. So if you want to repurpose part of the template, you need to do so manually.
The best way is simply duplicate the item, then move it wherever you want it. Duplicating an element on a slide is easy.
To duplicate an item, click and drag the item while holding CTRL+shift on a PC (or just Option key on a Mac). This will make a quick copy that can be moved or edited.
How to update images in a template
It’s common for templates to have some images included as part of the core design. This is helpful when you want to make sure that everyone is using the same, high-quality images.
But if you want to change that image, you don’t need to go back to rebuild the template. Once you’ve made a new slide with the image you want to replace in it, simply right click on the image and select Change Picture > From a File… and then choose the image you want to use.

How to compress images in a presentation
Once you’ve replaced an image, or anytime you are adding images, it’s a best practice to also compress your images to make sure your file doesn’t become too large.
There are a number of options you can choose from to set the right file size and fidelity, but in general we recommend setting your photos to On-screen (150 ppi), as this offers the best mix of file size and quality.
Be sure to check if all the images are compressed. If you batch compress your images, we recommend taking a second pass through the end results, as occasionally an image will come out looking wrong after compression.

Interesting videos in your template
To add a video (or other media) to your template, just choose a slide type, navigate to the “Insert” menu, then select “Video” on the right-hand side and choose “Movie From File.” From there, just choose the file you want to add and resize it as needed.

Customize graphics with extensive formatting options
Your template should be designed to account for most of the common situations a presenter might need to address. But there will always be occasions when a little customization is necessary.
For nearly anything in PowerPoint, you can use the Format Pane to get granular with your edits.
Start by selecting the asset you want to edit, click the Shape Format tab at the top, and then Format Pane at the right side.
From here you can change the look of text, shapes, and more.

Printing content from your template
Most templates are built in widescreen, or a 16:9 format. As a result, printing directly to a standard 8.5x11” paper will render white margins above and below your slides.
To ensure your template print outs fit the page size you’re using, select the “Scale to fit paper” option to make sure the ratio of your slides fits the paper you are using.

Save your template as a theme
A theme is essentially a slimmed-down version of your template. When you use a theme, any new graphics (like shapes or charts) will default to using the colors in your theme, making visual consistency quick and easy.
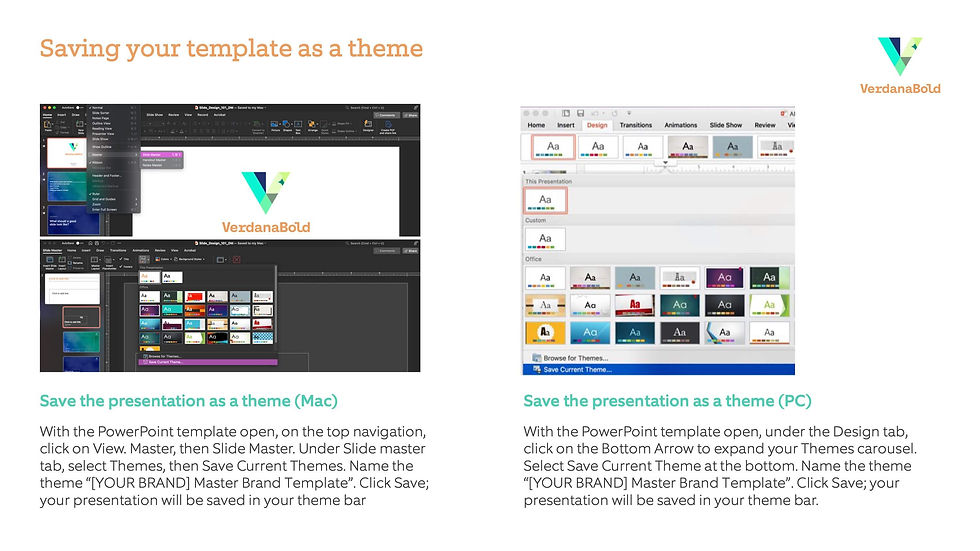
Saving as a theme on a PC
With the template open, on the top navigation, click on View, Master, then Slide Master. Under the Slide master tab, select Themes, then Save Current Themes. Name the theme “[Name] Master Brand Template”. Click Save; your presentation will be saved in your theme bar.
Saving as a theme on a Mac
With the template open, under the Design tab, click on the Bottom Arrow to expand your Themes carousel. Select Save Current Theme at the bottom. Name the theme “[Name] Master Brand Template”. Click Save; your presentation will be saved in your theme bar.
Conclusion
Templates are powerful and effective tools, and the limitations that they offer are actually a major part of the benefit. But just because a template is clearly defined doesn’t mean you can’t still make it your own.
With a few key ideas and a little bit of experimenting, your branded PowerPoint template can open up a whole new world of creativity!
Looking for more information about branded PowerPoint templates and beyond? Check out our resources for expert advice and tested strategies.
About the author
Kyle Kartz is the Creative Director of Storytelling at VerdanaBold. He is an expert copywriter and strategist, with experience driving major campaigns for global brands in multiple industries. He is passionate about communications, the outdoors, and cooking.